Have a great 4th of July and I hope you liked my simple card. Thank you.

My new passion is water coloring. I was so surprised how easy it is to water color. And the best part it doesn’t have to be perfect! My card today is water coloring stamped images.

My card design was inspired by this You Tube Video.
DETAILS:
The card is 5-1/4” square. I used water color paper that is 140 lb. weight and cold pressed. Paint medium used is Distress Ink by Ranger. The stamp used is called Favorite Flowers. I placed tiny sequins and rhinestones on the front of the card for a little bling. And I used glossy accents to hold the sequins in place. What I love about water coloring is all the imperfections that happen once it dries and yet it has such a neat look. You should try water coloring you would love how easy it is. If you have Distressed Inks in your stash then all you need is some water, water color brush, and water color paper. Using Distress Inks makes water coloring FUN!
You can get the following items from Cutters Creek Online Store:
Thank you for stopping by and I hope that I inspired you to try the water coloring technique.
Fran


DETAILS:
The card measures 5-1/2” square. Background done in Chalks by Pebbles, Inc. The bench was cut from real wood paper and then stained using Vintage Photo Distress Ink. The bow in the corner was cut using the Silhouette Portrait and colored with a Copic Marker. The flowers were created using a gold frame sticker and water color paper. Colored the flowers using water color paints. The Magnolia Image was colored using Copic markers. Rhinestones on the flower centers and small sentiment tag are from my stash. Used Pop-up Adhesive dots behind flowers, bench and Magnolia image. And Glossy Accents is holding the bow in place.
Items you can purchase from the Cutters Creek Online Store:
Highlighted items can be special ordered through Cutters Creek. Contact Kim here.
Thank you for stopping by and I hope I inspired you in some way today.
Fran


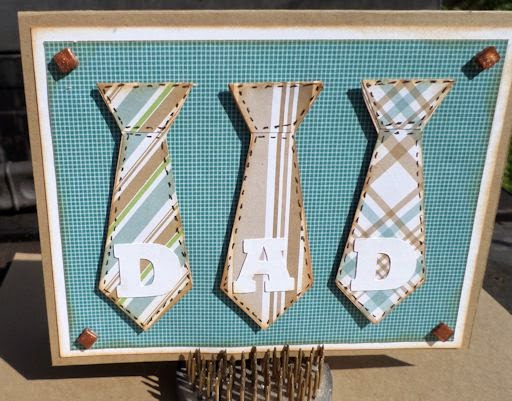
Details: The BBQ Monkey is a digital image by Digi Boutique. The image was colored using Inktense Pencils. Everything is held together using Scotch Quick-Dry Adhesive. Digital papers and black check printed paper are from my stash. The envelope was created using the We R Memory Keepers Envelope Punch Board. The card is 5-1/4” square. The envelope is 5-1/2” square. Other tools used were Paint Shop Pro and the Silhouette Portrait.
I made this card for my younger grandsons to give to their Dad. My son-in-law loves to cook especially on the grill. I think he will get a charge out of the card.
The items highlighted above are items that Kim of Cutters Creek Online Store can special order for you. You can contact Kim here. Take some time to visit the store to see all the neat crafting tools and accessories for scrapping and card making.
Thank you for stopping by and I hope in some way I have inspired you.
Fran


(Inside view)

I love cards that have many layers and lots of dimension but there are times you just don’t have the time to spend on elaborate cards. Do you ever feel that way? So I am working on making more simplistic cards that are appealing to the eyes. I was inspired by a card I saw on the Internet. Below are the details.
Details: The card measures 5-1/4” square. For the the odd size cards I use my Envelope Punch Board by We R Memory Keepers to make my envelopes. This was a special order through Kim.
The three strips on the card are not any particular size. You make them the size that appeals to you according to the size of your card base (make them a little wider than the card base). I used a 6x6” paper pack from my stash so that the strips blended with each other. I glued them on an angle and trimmed the edges to match the card base edge.
The Flowers were made using a die from Memory Box called Petal Party. I used the remnants from the strips of paper to make the flowers. Then added a rhinestone in the centers for some added bling. Love that bling!
The sentiment “Hello” was cut on my Silhouette Portrait that I ordered through Kim. Tip: When you have a delicate and very thin sentiment like the “hello” gluing it can be messy and frustrating. So I squeezed some glue on my craft mat and spread it out thinly with my finger. Then I placed the “Hello” on top of the glue using slight pressure. You get just the right amount of glue and there is no glue mess.
Inside I just added 1/2” strips using the same printed card stock that is on the front of the card. Added a flower using the same card stock I used on the front of the card too. This look brings the outside to the inside.
The best part of one layer cards is they are so easy to mail and the postage is so affordable.
If there are any products I used you can always contact Kim and ask if she could special order it for you. And remember Kim has a Lay Away Plan. And don’t forget to check out the Cutters Creek Online store for all your crafting needs.
I hope my card inspired you to pull out your scraps of paper or that paper pack you haven’t used yet. Thank you for stopping by the blog.
Fran