Saturday, September 29, 2012

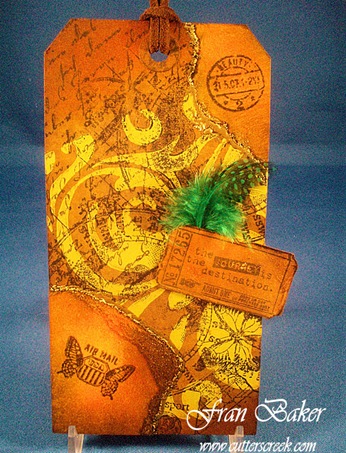
Paint Dabber Resist Tag


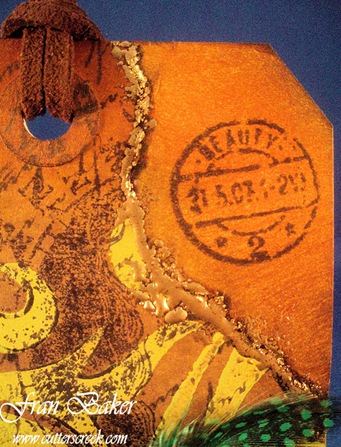
I’ve been wanted to use my paint dabbers for a while now and I watched a Tim Holtz video where he did a paint dabber resist. I didn’t want to go all crazy and use nothing but paint dabber paints so I chose one of my favorite colors from the Paint Dabber colors called Citrus.   The actual product is called Adirondack Acrylic Paint Dabber and Citrus comes from the Brights Collection.  Because it was my first time I went a little easy on myself and chose to make a tag using Ranger Craft Tags #8 manila.  I chose to use glue two of them together for more stability.

I took one of my large background stamps and covered it with the Citrus acrylic paint dabber and stamped the background design on the tag.  Then I used a few Distress Ink Pad colors – Spiced Marmalade, Vintage Photo, and Pine Needles.  On the front of the tag I covered it with the spiced marmalade and vintage photo distress inks.  Then I took a paper towel and dampened it with a little water and wiped the distress inks off where the Citrus acrylic paint was stamped to remove the distress inks.  So easy to do and what a neat effect too.  Then I took a few other stamps I had in my stash and inked them with Memento Tuxedo Black ink and stamped all over the tag in various directions to give it a vintage flair. 

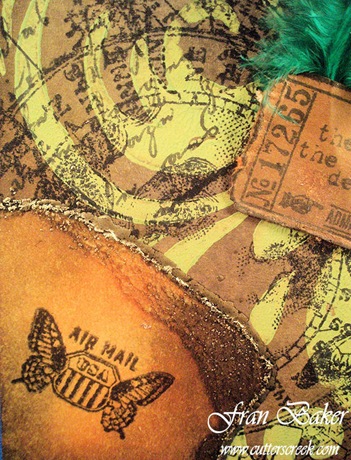
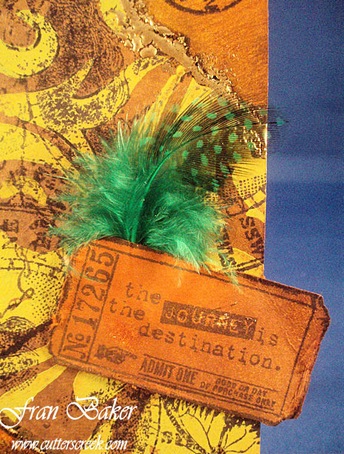
The next thing I did was take a tag which was not usable and tore two corner pieces off of it and glued them to the top and bottom corners of my tag.  I stamped them and also used the same colors of distress inks on them.  On the torn edges I covered them with Versa Mark and then added WOW! Embossing Powder in Metallic Gold Rich.  Took out the heat gun and melted the embossing powder. The look is really different because the edges were torn.  Then I added a couple elements (ticket, feather, and leather look ribbon) to finish off the tag.  Here are the photos of the completed tag.  Let me know what you think.

Paint Dabber Tag

WOW Tag

WOW Embossing Powder View

WOW Embossing View 1

WOW Embossing Powder View

WOW Embossing View 2

Distressed Ticket & Feather View

Ticket and Feather View

Thank you for stopping by,
fran red

Wednesday, September 26, 2012

Fall Scrappin' by Laura C

Cool, crisp fall is here! Are you ready?  For the fun trips to the pumpkin farm, Trick or Treat, or just enjoying the change of the seasons in all it's beauty.

This LO will hopefully inspire you to take some GREAT pics this fall, and also some inspiration on how to scrap them!


Kim has some of this gorgeous MME Lost and Found Halloween collection....6x6 is in store....12x12 can be ordered!  I also used the chipboard elements, and punch outs from this collection.  Every little
embellishment came from these sets.  They have SO many goodies to choose from!  I also played with the new Tim Holtz Tinsel Twine (Autumn collection)....it added just the right amount of bling up by the MME banners--it's attached with Tiny Attacher Staples. Every piece of this LO was inked up with Black Soot Distress Ink as well, and a little touch of twine finished it off.  All the glittery bling, is from the MME collection....it comes ready to go!

Hope you have a great time making some beautiful fall memories.....and remember to take a little time to preserve them!

Happy Spooktacular Scrappin'!!

Tuesday, September 25, 2012

Cricut Flower Shoppe Flowers by Tee


I have gotten a lot of very positive feedback on my roses made with the Flower Shoppe cartridges that I decided to make a video to walk you though making them.


See the video here:


I cut my flowers at 2 1/2" and inked with Tim Holtz Distressed Inks.

I hope this video inspires you to make your own! If you do, please make sure you post so I can see.


Sunday, September 23, 2012

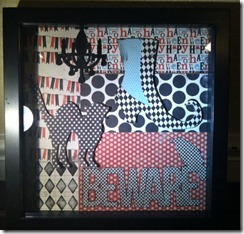
Beware

It’s time for fall and I’ve been trying to round up all my fall/Halloween decorations for the house.   I like the idea of changing out some of the artwork in the house to match the season.  I didn’t have any Halloween art, so I decided to make some.  I’ve had this little shadow box hanging around for a while and it’s perfect for this.  I love the new Halloween paper pack from My Mind’s Eye Mischievous.  The patterns in this pack are great and I wanted to showcase as many different ones as I could.

  photo(9)

Sorry for the glare in the picture it’s from the glass in the shadow box.  I layered different patterns to fill the back of the shadow box.  Then I went through my cricut cartridges to find some good die cuts.  I cut the cat and beware from the Chic and Scary cartridge and the witch’s shoe is from Happy Hauntings.  I popped the cat and the shoe up from the background to give the box more dimension.  I used the ASI clear foam.  This stuff is great.  Not only is it clear so you can’t see it, but it’s flexible and you can shape it to fit your die cut.  I also added this little wooden chandelier shape up in the corner that I covered with the Wow black embossing glitter. 

When you need a new piece of home décor, don’t forget about your scrapbook supplies.  It’s easy to make just what you need. 


Shopping List

My Mind’s Eye Mischievous Paper Pad

ASI Clear foam on a roll

Wow embossing Glitter

Various Cricut cartridges 

Friday, September 21, 2012

Halloween ATC by Chris


I usually create a project as I go along, but this time I did all the pieces first and then just put it together.

I started with a block of wood 2.5x3.25 and painted it with black acrylic paint. While it was drying, I stamped several images on Inkessentials Shrink Plastic Sheets with black Ranger Archival Ink (you could use Stazon too) and set that aside to dry. I just love the Pixie Cottage’s Hannah the Witch and La-La Land’s Skeleton Luka! They shrunk down to such a perfect size for the block. I had several metal Halloween metal charms that I cut off the links, and then, colored them and my stamped images with my copic markers. Once they were all colored, I used my heat gun to shrink them. I then used Tim Holtz’s On the Fence die, which I inked with Weathered Wood Distress Ink, and my Happy Hauntings cartridge to cut out a 2” blacked out house and the pumpkin treat box (cut at 6 inches). I created a couple of banners using paper from my stash and Doodle Twine Halloween selection.


All paper edges were inked with Black Soot Distress ink and some “ground” was made using Gathered Twigs Distress ink. Everything was adhered with either Glossy Accents or Scor Tape. A few added stickers from last year’s Echo Park paper finished the project, and all I need to do is add a treat to the pumpkin for my granddaughter. Happy Haunting to all of you.

Wednesday, September 19, 2012

HAPPY FALL!


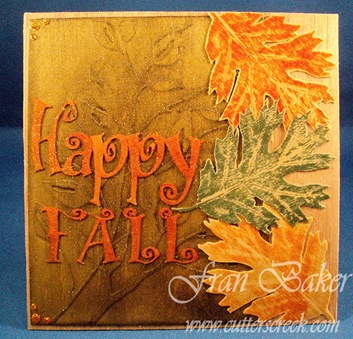
I bought this unique paper made out of real wood from McMahon Five Designs.  And I’ve been meaning to make a project using it but I could not think of a theme where the wood paper would make all the difference.  Then it hit me!  I will do a Fall Theme.

Here is a photo of the card.  Just click on the photos to get a closer view.  Below the photos are all the details of how I made the card.  And supplies used purchased from Cutters Creek to get the final look.

Happy Fall_Front View

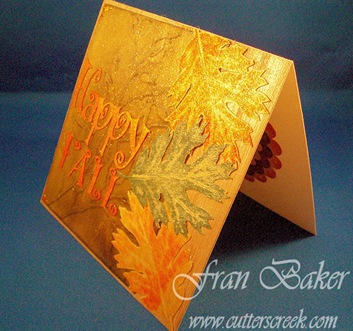
Happy Fall-Side View

The card base is Neenah Classic Crest Cream 80#.  The top layer of wood paper covers the entire front.  Then I used another layer of wood paper about two-thirds of the card front.  I embossed it using a Cuttlebug Embossing folder (Leafy Branch A2) and my Craftwell eBosser.  Then I used Forest Moss Distress Ink pad to color the wood embossed paper.  I used a large leaf stamp and stamped three leaves on more of the wood paper.  I used two shades of Distress Ink pads (Pine Needles and Spiced Marmalade) and distressed the leaves.  Now here is the best part.  I wanted to use a cursive style font for the sentiment (Happy Fall).  I chose two different ones.  And used both of them. I had no clue if my Cricut Expression was going to cut the letters out using the wood paper because the font was curly on the ends of each letter.  Well to my surprise and only making one mistake (human error) it cut the letters out of the wood paper perfectly.  I removed the letters and distressed them using Spiced Marmalade Distressed ink pad.

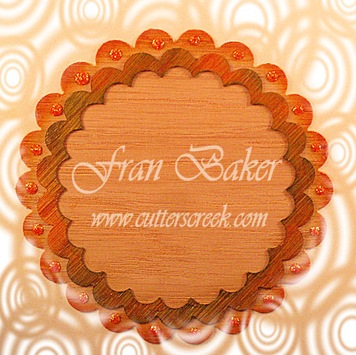
The inside of the card is also decorated with wood paper using my Classic Scalloped Circles Large (6 dies) by Spellbinders Nestabilities and the Craftwell eBosser.  They cut out perfectly using the prescribed sandwich as indicated in the manual.  The inside gives the illusion that there are three scalloped circles.  But the top portion was made using two different size scallop circles to get a scallop frame/border.  I also distressed the edges with Orange Marmalade and Pine Needles.  Added some Orange Peel Stickles to the scallops.  I left the center in the natural wood color for stamping the sentiment.

Happy Fal_Inside View

And I sprayed the front and back of the card with both Iridescent and Gold Glitter Dust.

Note:  If there are any supplies used that are not currently available at Cutters Creek please contact Kim Bush and she may be able to special order it for you.  Thank you for stopping by.


image

Tuesday, September 18, 2012

Holiday Wishing Well by Deanna M

I have for you today a Home Decor or Gift Item. I saw this wishing well in one of the KaiserCraft Workshop magazines Kim sent me and I just had to have one. I thought this would make a cute table decoration for just about any event. You can use it as a bank if you wish.

As you can see, I decided to decorate mine up for Christmas. First I painted all the areas I wasn't going to cover with paper with my Bottle Green Adirondack Paint Dabber. I then traced around my pieces onto my patterned paper and attached them to the wooden pieces with some Matte Glue N Seal. I really  like this adhesive and find it doesn't wrinkle my paper like some of the other products out there. Once I had all my pieces covered with paper I sprayed them all with some Gold and Silver Glitter Dust. WOW! Do they sparkle, love it.


I let everything dry overnight and then put my pieces all together adhering them with a little Beacon 3 in 1 Glue and the tabs to help secure the pieces together. I really like this glue thought it can be a bit stringy. It is my go to glue with nothing else will work, like when I am glue wood, or metal pieces. It is a thick clear glue and dries clear. I added some Cabbage  Glitter Tape (just ask and Kim and order this for you) along the edge of the roof peak and the top and bottom of each side. Finally I hot glued a few small roses to each side of the well.

It was a lot of fun to do and really quick and easy. I know Kim can special order one for you if you are interested.

Sunday, September 16, 2012

Double Breasted Pocket Card Tutorial By Ms. Pebbles

Hi everyone!
Here's a quick video tutorial for the Double Breasted Pocket Card front that I made. Thanks for watching...enjoy! :)
Some Products used:

- Ecko Park Country drive page kit
- Bazzill Cardstock
- Stickles
- Kaiser Kraft Rhinestones
- eCraft Purpleberry
- Foam squares
- Scor Tape


Thursday, September 13, 2012

Winter Wonderland Card by Deanna M


My card for you today is a 5" X 7" white card stock base. I added a black mat cut a 4 3/4" X 6 3/4". I then added some snowflake paper from the My Minds Eye Winter Wonderland  6" X6" paper pad. I then cut some white card stock to look like a snow mound and added some Flower Soft Glitter Frosting Hint of Green. I wanted to cut my pond from some of the Tim Holtz Mirror Sheets. I will tell you it did not cut well with my Cricut. I cut the pond from the Create a Critter cartridge at 1 1/2" and used my Gypsy to hide the little ripples that cut. (The pond is found under the accessory feature on the hippo cut). I used a multi cut of 4 and did that twice so 8 times but it still didn't cut. I did use the line cut by my cricut and my Tim Hotlz scissor to cut out my pond. I cut my ice skater at 4 1/2". I used paper from my stash for her. I then stamped my sentiment. Sure hope you like her. It was a bit hard to photograph the mirrored paper and it is picking up the reflection from the "white snow".


Monday, September 10, 2012

Minnie Mouse Birthday Card by Tee


Who doesn't love Mickey and Minnie Mouse??? When I sat down this week to make my design team project I noticed my Mickey and Friends cart was sitting on my desk - I opened it and knew right away that this Minnie would be the perfect birthday card for my great niece...


Mickey ears were cut at 5 1/2"(Shadow) in Chipboard and black cardstock then cut again in Pink and covered in Diamond Stickles (of course).
I inked all my edges using Tim Holtz Distress Ink pads in Worm Lipstick and Black Soot,


Card measures 6x6 .. I can't wait to give it to her.
~Tee


Sunday, September 9, 2012

Feel Better Kiddo!


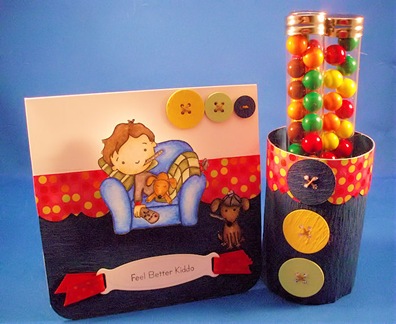
Today I bring you a cute card for a little boy who is feeling under the weather.  And what do you think would make the little boy feel just a tiny bit better?  Well I thought maybe some candy coated chocolate treats.  And the treats are in special tubes (3) just for him.  Oh and did you see his little doggie he isn’t feeling good either Sad smile They both have a slight fever.  Do you think some doggie treats will make Fido feel better?  I hope so!  Oh and the little boy and the chair is on an action Wobble.  It is so darn cute when you touch the image and it just wobbles.  How much fun will that be for the recipient.
Get Well Card For Little Boy with Treats
(click on photo to view larger)
Cutters Creek  Supplies Used:  Stickles Glitter Glue, Copic Atyou Spica Glitter pen, Action Wobble,  papers, tag, buttons and digital stamps are from my personal supplies.  The buttons were made using a Memory Box Die called Round Buttons, the digital stamp of the little boy and chair with pet dog was colored using Prisma Colored Pencils.  And the Digital sentiment stamp was created on the computer. The tag is by Spellbinders Shapeabilities (Ribbon Tags Trio). If there is anything you see here that Kim Bush of Cutters Creek does not carry in the store she may special order it for you.  All you have to do is contact Kim here.


Thank you for stopping by Cutters Creek Design Team Blog and viewing my latest project.
Butterfly 2 Signature2

Friday, September 7, 2012

Quick and Easy Cards by Chris


What does Ecstasy Crafts 3D Sepia Card Kit + Flower Soft Peel Off Stickers + Iridescent Glitter Dust equal? Really easy, really lovely, 3D shimmery cards. Try them. These two went together in a night and there are two more in the kit. While the Glitter Dust doesn’t show up that well in the photos, believe me when I say it really adds to the effect of a winter scene.

Tuesday, September 4, 2012

Tutorial Tuesday....Water Stamping by Laura C

I'm always on the lookout for a new
technique to try, and it seems there
is always a new way to use your
stamps.  This technique is called
"Water Stamping" and here is the
card I made using a variation of
this:


The technique starts with using
dye inks (I used Distress Inks:
Seedless Preserves & Black Soot)
and applying them to your white
cardstock:

The heavier the application the
better here...I did go lighter,
because I wanted more of a
"washed" effect to keep it
spooky for Halloween.

Next, you choose a favorite
stamp, and you can do one of
two things....spritz the stamp with
a mist of water (I did this using the
Inkssentials Mini Mister) or you
can use a VERY wet paper towel
in a pie plate or something similar
and dab the stamp on that (as if
you were dabbing it on an actual
ink pad)....then stamp onto the
inked surface.  You can let this
air dry, or use a heat tool or a
quick iron on the BACK of your
image, my result was this:


This image came from the Tim Holtz
Winter Sketchbook stamp set.  It
looks like a great spooky image....
and I added a second stamp of the
tree in Black Soot Ink to define the
image, then dressed the card up
using the new MME Lost & Found
Halloween collection paper, and
a sentiment from the paper punch
out sheet, bling from Want2Scrap,
black & white twine, and I brushed
the edges of the card with Eggplant
Adirondack Paint Dauber from Kim's
club.  I couldn't help but add a bit of
black burlap behind the image too for
some fun texture.

And the finished card once again:

This technique is one that is fun to
experiment with....different inks,
applying more/less ink, more/less
water....so many possibilities!

Hope you are inspired to try this
technique and have a little inky fun!


Monday, September 3, 2012

Fall Banner by Deanna M


So Kim recently added some great products from Canvas Corp to the store and of course I had to try some out.

I got some of the mini Burlap Mini Triangles. These are just so cute and versatile. I decided I had to make a Fall Banner out of them. I started by spraying them with some glimmer mist. I used Rum Punch, Sugar Maple, Sun Sisters, and a little Coffee Shop.

I then used the Tim Holtz Tattered Leaves die to cut my leaves. (Kim doesn't have this die in the store but I bet she can get it for you.) I used my awesome new eBosser to die cut my leaves. (love that machine!!!) I used some of the Tangerine My Minds Eye paper to cut my leaves. I inked my leaves with some distress inks in fall colors.

For the word FALL I used the Birthday Bash Cricut Cartridge and the Tim Holtz Kraft Core Paper (Kim can get this for you). I cut each layer 4 times so I has some thickness to my letters. I then embossed them using the Clear Gloss WOW! embossing powder. I did embossed my letters twice. I then attached everything to my burlap triangles. I then painted some of the natural mini clothes pins with some Indian Summer Glimmer Glaze (a special order item from the store).

I then outlined the leaf on each end with my Spica Glitter Pen in Orange. To finish my banner I used some gold colored hemp and hung each triangle from the hemp with the clothes pins.

Sunday, September 2, 2012

Christmas pocket card. By Ms. Pebbles

Hey everyone!
Now is the time to start making your Christmas cards, if you don't want to wait until the last minute (like I usually do...lol).


This is a size A2 card. I watched a tutorial on how to make the pockets but for the life of me I cannot remember who's video it was that I learned this style from, so please forgive me whomever you may be, but all props to you!
Now, after making the pockets. I embossed a piece of patterned paper with the Cuttlebug Spots & Dots A2 Embossing folder, and set it as the background. Using another piece of scrap pattern paper, I covered the inner layer and added some green sparkly ribbon to the edges. The outer layer was covered the same way and I added a green and red punch in the lower corner curling the petals of only one to give a little bit of a flower on a base with a gem in the center.
I made the little tag to show the pockets, but I'm quite sure more tags with different sentiments would be soooo cute!
Thanks for looking!!! :)
Related Posts with Thumbnails