Monday, October 31, 2011

Melissa's Halloween Door Hanger

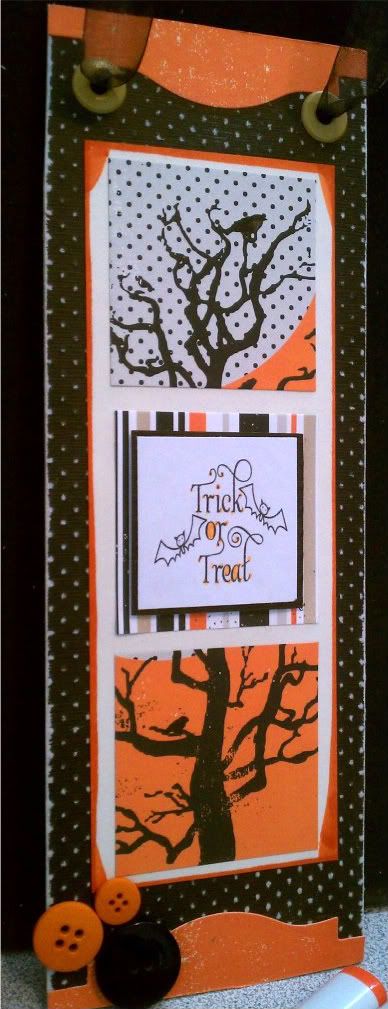
I started with an inspiration from the Sept/Oct issue of PaperCrafts Magazine (from page 60 if you have it).  I loved the idea of a holiday door or wall hanger.  My project ended up being 12" tall by 4" wide if you want to make one of your own. 

I took the cardboard from some empty cereal boxes and double layered for extra thickness.  I than cut some black paper from the Bazzill Dotted Swiss Pack and filed it down to make the dots pop.  Using my Spellbinders Labels 18, I cut out the largest shape on a sheet of orange paper from my Echo Park Apothecary paper pack.  I trimmed off the edges and added it to the top and bottom of my hanger.

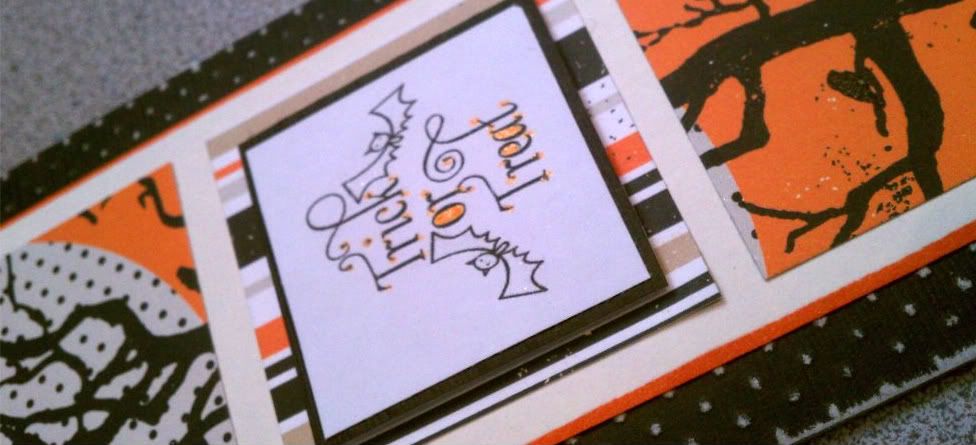
I took a cream piece of paper from my stash and traced the edges of it with my copic YR18 for some added pop and added 3 squares of paper from the Echo Park Apothecary pack.  I added holes and eyelets with my big bite as the thickness of the cardboard and paper made it a little difficult with my cropadile. 

I added buttons from my stash and colored some white ribbon with my Copic 110 to add some black.  I printed the sentiment for free from here, trimmed and lined it with some left over black paper and used Kool Tak to make the sentiment pop up.

Then for extra, I went over the sentiment with my Spicas and the birds in the trees.

Hope you like it!! 


Image:  PaperCrafts Magazine Trick or Treat
Paper:  Bazzill Dotted Swiss, Echo Park Apothecary
Ink: Memento Tuxedo Black, Copics, Spicas
Embellishments: Spellbinders Labels 18,
Other: ATG, Big Shot, File Set, Kool TAC, Big Bite, Scor-Tape
Stash: buttons, ribbon, eyelets, cardboard, cream paper

Sunday, October 30, 2011

Glittery Christmas Ornaments

Last year I went a little crazy making glittery Christmas ornaments out of the clear glass balls you can get at craft stores.  This year I wanted to try something a little bit different. I wanted to find  a way to use my Cricut Imagine to print some holiday images on vinyl and add them to the ornaments.  I found these square shaped ornaments and they were perfect.  This is what I came up with using the Snow Angel cartridge. 

ornaments 1 [1280x768]

To start this project, you need clear glass ornaments which you can find at most any craft store, some floor polish, and glitter.  The floor polish I used for this project is

ornaments 2 [1280x768]Pledge Future Shine.  You won’t use a lot of it, so one bottle will last you quite a while.  Pour some of the floor polish into the ornament and carefully swirl it around to coat the inside of the ornament.  I cover the opening with a baby wipe.  Try not to shake it or you will get bubbles which can be harder to get rid of.  Pour the remaining floor polish back into the bottle. Let it dry a little bit and pour your glitter in. Shake the glitter all around making sure the entire ornament is covered.  The great thing about these ornaments is that all the messy glitter is on the inside of the ornaments you don’t have to worry about it rubbing off. 

Next, I cut come of the adorable designs from Snow Angel on some printable vinyl in my Imagine and then stuck them to the front of the ornament.   A little bit of ribbon is the perfect finishing touch. 

ornaments 3 [1280x768]

For this cute little snowman ornament I used green glitter to match the green in her hat.  I added a little bit of polar white flower soft to make it look like she’s really sitting in the snow. 

ornaments 4 [1280x768]

I thought this Happy Holidays image would be perfect with some blue glitter.  I finished this one off by adding some diamond stickles to the snow on the ground and on the house. 

I hope I have inspired you to grab some floor polish and get creating.  It’s much more fun than using it to polish the floor!!!!


Cutters Creek Shopping List

Cricut Imagine Snow Angel cartridge

Polar White Flower Soft

Diamond Stickles

Wednesday, October 26, 2011

Chris' Beyond Birthdays Cricut Card

Need a quick and easy card? Use the card foundations on your Cricut cartridges. This one is from Beyond Birthdays.


I started with my papers. I knew I wanted to use the floral piece as the card base, but the blues and greens I had for accents were a bit too bright. To tone them down I rubbed Peeled Paint Distress ink on the green and Weathered Wood on the blue and misted them.

Once that was done the card was a breeze. I set the dial size to 7 inches on my Cricut Expression and kept it there for all the cuts. I then chose the Foundation key: card and the “hugs to you” image. Once that cut, I chose the Foundation key: Framed and the “hugs to you” image. I now had the card with a circle opening, the words “hugs to you”, and a circular frame. I cut the blue paper to fit the inside of the card (about a 4.75 square) and glued it down with my ATG. I then glued the circle frame around the opening with a Zig Glue Pen. Using Spellbinders Nestabilities Classic Small Circles, I cut a 2.5-inch circle from black cardstock, and a 2-inch one from Apricot POW! Glitter Paper. I centered the black circle in the opening and glued it down with my ATG. I mounted the words on the smaller circle using my Zig Glue Pen, and then used pop dots to mount it on the black cardstock circle. The final touch was a Lemon Lime Cutters Creek Gardenia flower.

Tuesday, October 25, 2011

Transform Your Die Cuts - Deanna M

I have a Tuesday Tutorial post for you today to show you how you can transform your simple die cuts. I got my inspiration from the trees I could see on the other side of my fence, aren't they beautiful? I decided to make a fall card with leaves and I wanted to incorporate the colors from the trees into my leaves. I started by cutting a leaf from the Straight From the Nest Cartridge at 6" out of white card stock.
Next I pulled out a bunch of my distress inks in fall colors. I chose Wild Honey, Rusty Hinge,  Spiced Marmalade, Fired Brick, and Crushed Olive. Using my foam applicator I randomly applied some of the ink to my leaves.
To give my leaves a more realistic look I went into my backyard a picked a few leaves off of a small tree and using my No More Shims Embossing Mat and embossed my leaves using the veins and stems on the leaves from my backyard. Finally I spritzed everything with some Glimmer Mist. I used Rum Punch, Honey Dew Melon, Jingle Bells, Sun Kissed Peach, and Sugar Maple to layer on some additional color and some glimmer to the leaves.

I then pulled some ivory card stock from my stash to make a 4 1/4" X 5 1/2" card base. My mat and  patterned paper are from the My Minds Eye Sunshine Paper Pad. I pop dotted the orange leaves to the card and the attached the yellow leaf to the orange ones. I added my sentiment stamped in Distress Walnut Stain ink. The little nail heads and ribbon are from my stash. I am really pleased at how realistic the leaves ended up looking and love how easy that embossing mat was to use to get this look.

Sunday, October 23, 2011

Merry Christmas Card - by Deanna M

Today I have for you a simple and quick Christmas card. I got the idea for this card from a magazine where I saw that they had stamped a simple Christmas tree shape on patterned paper. Of course I looked at that and said, I can recreate that with my Cricut and this is what I came up with. All of the patterned papers is from the My Minds Eye 12 Days of Christmas 6" X 6" paper pad which is two sided paper and I used both sides of the paper on my card. I started with a 4 1/4" X 5 1/2" cream colored card base. I cut a mat from some red paper, which is the reverse of the middle tree, from the paper pad at 4" X 5 1/4" and then cut a mat from the Merry Christmas paper at 3 3/4"X 5".  My trees are cut at 3 1/4" using the base layer of the Christmas Tree on the Celebrate With Flourish Cricut Lite cartridge and the reverse of the two red mats. My small red mat is cut at 2 1/4" X 5" and I used a scalloped border punch on it. I then cut a blue patterned paper, which is the reverse of the Merry Christmas paper. This was cut at 1 3/4" X 5" and I used the same scalloped border punch on it. I added the trees with foam dots and finished them with some Golden Rod Stickles on the stars and I painted the tree trunks with some Cowboy Glimmer Glaze (Kim from Cutters Creek will happily special order this item for you). This card is colorful and went together quickly so would be easy to produce multiples.

Tuesday, October 18, 2011

Bee-utiful Thank You by Laura C

Tutorial Tuesday is a simple way to take your cards or
any project up a notch......using Want2Scrap's nestabling
and nestaboard!! You can see the pieces you layer up
for easy impact, in the pic below:


On the left....the nestaboard, the middle, the piece cut out of
cardstock that matches this set, and the nestabling on the right.

The card is a simple 5&1/2" by 4&1/4" base of kraft
cardstock. The beehive and bee paper is from the
Echo Park Country Drive 12x12 collection, and layered
with solid black cardstock. The flowers, bees and the
"thanks a bunch" sentiment are all from the Echo Park
set as well and layered with foam tape. The die cuts
are made with the Spellbinders Fancy Tags 2 set and
the piece behind is cut from black cardstock using
Spellbinders Labels 22.

The papers were inked with Black Soot Ink and
the Doodlebug Bakers Twine touches finish it off.

Hope you enjoy this quick tutorial idea....and check
out Cutter's Creek for this awesome product....it
will add dimension and sparkle to your project!

Available at Cutter's Creek:
Echo Park Country Drive 12x12
Want2Scrap Nestaboard and Nestabling
Distress Ink (Black Soot)
Spellbinders (Fancy Tags 2 and Labels 22)
Doodlebug Bakers Twine

Monday, October 17, 2011

Cricut Thanksgiving with Lori

Welcome!  I have another Cricut project for you today, using one of my favorite seasonal Cricut cartridges.  The Thanksgiving Mini cartridge is useful for all kinds of goodies.  So far this month I have made a pretty garland and some Thanksgiving helpers, and I'm sharing them all with you here.

First up, my leaf garland.  I have a grapevine tree in my kitchen; it's a bit like a Christmas tree made of grapevine, but it stays out all year long.  I just got it last year, so I am slowly adding to my stash of decor for it to wear.  This year I made a garland of leaves using the leaf cut on the Thanksgiving cartridge.


Using my Gypsy, I hid all of the interior cuts on the leaf so I was left with just an outline.  I then copied it multiple times on my virtual mat so I could cut several at once.  I pulled a variety of papers from my stash in Fall colors, including some colored vellum, some suede-finish paper, textured cardstock, and some American Crafts glitter paper in Leaf.  (I used a stamp pad to ink the back side of the glitter paper in case they flipped over some.)  After the leaves were cut, I used various colors of Stickles to add some swirly veins to the leaves.  Once the Stickles were dry, I punched holes in all of the leaves, then tied them onto some hemp cord a few inches apart. Then all I had left to do was wind it around my tree!

Next are my little Thanksgiving helpers.  Did you know that this cartridge comes with napkin ring and place card designs?  (In fact, the place card is useful for any occasion as it has a simple flourish design.)  Here's the napkin ring and place card design:

To fit my paper napkin & plasticware, I cut my napkin ring at 1", but I would definitely go larger for a cloth napkin or larger paper napkin.  They are easily joined together at the back with Scor Tape.  I cut the place card at 2.5", as well as the place card layer.  I cut the layer from black CS and adhered it to the card, then added Stickles to it.  I used Distressed Stickles in Scattered Straw, Spiced Marmalade, and Fired Brick.

When we celebrate at my parents' house, there are usually over 40 of us with an equally large amount of food.  It gets hard to keep track of what everything is, so I thought the place card would also make a great way to label the various foods:


Using my Gypsy again, I hid all of the interior cuts on the place card layer.  I copied it to a second one then resized the copy slightly smaller to fit inside and joined them together.  Then I selected the pie cut and fit it into the place card layer cuts and welded it there.  I also cut the pie layers at the same size as the pie.  After adhering the various layers to the place card, I dressed it up a bit.  I again used the Scattered Straw and Fired Brick Distress Stickles on the pie, and I added Frosted Lace Stickles to the steam.  I plan to make more with some of the other cuts on the cartridge to take with me so everyone can label their not-so-obvious dishes!

Friday, October 14, 2011

Elegant Edges Christmas Cards

One of my favorite things to do with my Cricut for cards is to make nice mats or frames for images.  So, I thought I would show you one of each on some Christmas cards I made.  Just a quick note: I use my Gypsy for this purpose, but if you have Design Studio or Cricut Craft Room, you can use them in the same manner.

First up, an elegantly simple card using papers from Graphic 45's Christmas Emporium paper pad.
5x7 card base

I started with a kraft card base.  I chose my design from the "Santa Express" sheet of images, cut it out, and measured its height & width.  Using my Cricut Gypsy, I chose a frame I liked from the Elegant Edges cartridge that had a similar height/width ratio. (Remember, Kim can special order just about any cartridge you want!)  I then "unlocked" the height and width fields so they wouldn't adjust together.  I then adjusted the height and width independently until the inner opening of the frame was approximately the same size as my cutout design.  (Slightly larger is great!)  I then cut the frame using some coordinating cardstock.

I then cut a 4.5"x6.5" mat from the green side of the "Merry and Bright" sheet.  I distressed the edges of all of my papers and my card bases using a sponge tool.  I adhered the green paper to the card, then layered on the frame using the ASI Kool Tak clear foam squares.  Next, I adhered the cutout design within the frame.  Finally, I added a touch of Polar White Flower Soft to my holly for added dimension.  VERY easy!

My second card takes a bit more time, but totally worth the effort for its beauty!

5x7 card base
I began with my vintage Santa stamp.  Mine is from my stash, but you can find a similar feel using the Crafty Secrets Vintage Christmas clear art stamp set.  Using the transparent ruler in my Cricut Tool Kit, I measured the approximate size of my stamp image.  I then chose a doily mat I liked from the Elegant Edges Cricut cartridge, and used my Gypsy to resize it until it was an appropriate size for my image, and cut it out.

I stamped my Santa image with Memento Tuxedo Black, colored it with Copic markers, then added his hat band and pom pom using white Liquid Applique sprinkled with clear glitter.  Note: to get this effect, sprinkle the glitter while the Liquid Applique is wet, then let it dry for a couple of hours before you heat it with your embossing gun.  I then distressed the entire image by sponging on some distress ink.  I also used the ink on my Doodle Bug twine so it would match better.  I stamped a small holly image on scrap as well, and colored & cut it out to use as an accent.

I used papers from Echo Park Paper's Season's Greetings 6x6 paper pad to create my background.  I used a brick Texture Fades embossing folder to create my accent piece on coordinating cardstock, then added additional dimension by distressing with multiple colors of ink.  I edged all of my paper pieces in black ink, since my image was stamped in black - it helps tie everything together.  I assembled the card, and popped up the image using the Kool Tak clear foam squares.

If you're interested, here's a list of specific Copic colors used in the Santa image:
E000, E00, E11, R20, R24, C2, Y17, YR04, YG63, G99, R29, R35, R39, and 0 colorless blender

Wednesday, October 12, 2011

Ghostly Greetings

This card was so fun to make! Have you ever just
started pulling out different things and see how
they all come together? That is just how this
card happened!

It starts with a simple 4&1/4" by 5&1/2"
black cardstock base. Next, a 4" by 5&1/4"
piece of white cardstock...inked up with
Black Soot and Dusty Concord Distress Ink
and then distressing the edges of this piece.

Then I pulled out some Tim Holtz/Sizzix goodies.
The Spooky Tree Die and the Picket Fence
On the Edge Die
. After I cut out the tree on
white cardstock, Black Soot Crackle Paint gave
the tree it's spooky texture. But I wanted to
add more to the background....the tree die cut
negative shape made a great stencil with some
Black Soot Ink.

The fence was cut from white cardstock, and
then heavily inked with Black Soot Ink. The
tree and fence are foam dotted to the card.
My little ghostie stamp on vellum and then
on cardstock (and colored with Copic C3
and blender) finished it off.

Next time you are "stuck" for a card idea....just
pull out a few items and see what you can do....
you never know where it might take you!

Available at Cutter's Creek:

Tim Holtz Distress Ink
(Dusty Concord, Black Soot)
Sizzix On the Edge Dies (Picket Fence)
Crackle Paint (Black Soot)
Copic Markers (C3, blender)
Sizzix Branch Tree Die....Kim can order this!

Breast Cancer Awareness Month with Kim B

October is breast cancer awareness month and as a breast cancer survivor myself, I try and do anything I can to promote this cause. If I had been diagnosed twenty, or even ten years ago, who knows where I would be now or if I would even still be here with my family and also my friends. So much has changed due to research and funding through so many foundations and organizations. It is hard to believe that there was a time when a woman would have her breast(s) removed and if she wanted to “replace” them, she would have to spend thousands of dollars for plastic surgery. Thank goodness those days have passed and treatments have gotten better by leaps and bounds. I know, because I am a breast cancer survivor of six years now. So don’t be one of those people that just don’t want to know. Early detection is the key! The earlier breast cancer is detected and treated, the more your chances go up for survival. So all you ladies out there, go have your female health checked regularly and don’t be one of those people who think it can never happen to you. I was one of those people. I have no breast cancer history in my family, however it has to start somewhere and for my family, it has started with me. So on with my project for breast cancer awareness month!

For my project, I decided to make a card for someone who has be recently diagnosed with breast cancer:


For my card I used both stamp sets from the Ink Pink Collection by A Jillian Vance Design. One of the great things about these two sets is that there are a lot included (each set includes a 4” by 8” sheet of stamps in your choice of round or rectangle, a pink acrylic block, 5 pewter charms, 5 pear pins, a sample of wrinkle ribbon, and a free Vera Bradley Zip ID case) and part of the proceeds will be donated to breast cancer research. Also, something of note: this is a Limited Edition set, so please grab one or both if you really love these!  There are a lot of images that can be used all year around and for any cause (just stamp your ribbons in the appropriate color). I stamped my black frame using black ink and then used the “Hope” sentiment to stamp in the center of the frame and then also stamped the “Think Pink” sentiment. I got out my Cuttlebug and Spellbinder dies and cut them out and then went a bit further and cut some additional decorative elements with my Spellbinder dies to mount these too. I then decided I wanted some bling, so I decided my card base would be POW! glitter paper in charcoal and added some Kaisercraft rhinestones to the pretty black frame that I stamped. As you can see, Spellbinder dies work wonderfully with this set. After all my pieces were assembled, I wanted something else and that is when I spied the border stamp on the rectangular set! I used a border punch to have a fancy border and them stamped the ribbon/pray for a cure border twice across. They matched end to end perfectly! I glued everything down and I have just a beautiful card! I hope you enjoyed my project and please feel free to leave me a comment regarding the card or the subject.


The following products used for this card can be purchased at Cutters Creek:

Ink Pink Stamp Collections by A Jillian Vance Design
American Crafts POW! glitter paper
Kaisercraft rhinestones
Memento Ink
Bazzill Simply Smooth cardstock

Tuesday, October 11, 2011

Chris' Nestabilities Halloween Card

Getting the most out of your die cutting tools, including Spellbinders Nestabilities is our goal this month. I decided to play with Labels Four for another Halloween card and since I have both the Large and Small Labels Four Sets, I decided to see what I could come up with. To start I made a shape card using the largest die. I folded a piece of the Graphic 45 Hallowe’en in Wonderland Collection (about 5 x 6 inches) in half and placed the die cutter so the top edge was above the fold (see the picture). I ran that through my Big Shot machine. After cutting it, I inked the edges first with Walnut Stain Distress Ink and then with some Black Soot Distress Ink.


Then using the third die, I cut a cream colored label which I color dusted with Antique Linen Distress Ink to tone down its brightness and bring it more into the range of the base paper’s tan coloring. I then cut a frame from some leftover Bargello strips (a previous card technique I shared) by nesting a set of two of the smaller labels four (the third one from the large set (same as my tan piece) and the third one from the smaller set. (See Picture) This I glued down using a Zig Glue Pen. Using Peeled Paint Distress Ink, I stamped the sentiment and glued it onto the front of my card base.


I then took out my Cricut Cartridge October 31st so I could cut the web and the spider. The web was cut at 4" and the spider at 2". Both papers are scraps from the Graphic 45 set. I trimmed and ripped the web a bit before gluing down to the card and then glued the spider on top of it and overlapping the sentiment.


Inside the card I cut one more Labels Four (second to largest of the Large set), color dusted with Antique Linen, and stamped my sentiment with Peeled Paint again. To finish off the card I added two tiny clear I-rock gems as the spider’s eyes.


I think I cut more Labels Four for this card than I have used since I got the set. Happy Halloween to all!

Saturday, October 8, 2011

Spooktacular Stackers by Laura C

This "spooktacular" Halloween decor was made
using the Echo Park Apothecary collection and
a few embellishments!

Here is a close up of the top of the stackers.....


This project started with 3&1/2" and 5" paper mache'
round boxes. The top box, was made by inking all the
edges of the box and it's lid, with Black Soot Distress Ink.
Then I cut out one of the labels on the EP journal box
sheet in the kit...it's a perfect fit! I did distress it up as well.
Then I just covered the box lid's edge and the box, with 2
different Pretty Papers (PP's) from the set (I measured
these to fit my box, the lid was 3/4" the box was 2").
The additions.....a 1/2" strip of the diamond pattern paper,
a tag cut from the journal sheet, I added some black brads,
the star sticker, bat sticker, and lizard legs sticker, all from
the sheet in the kit, and a tiny twine bow to finish it off.
I did ink all the paper pieces with the Black Soot ink and
the result close up is here:


Next was the bottom box....pretty much the same drill....
PP's cut to fit (1/2" for the lid, 2&3/4" for the box) I cut
the poison label out of the journal sheet (all pieces inked),
and the bottles and 31st October are stickers. The twine
and seam binding ribbon in grey, pleated and bowed.

Here's the close up:


The finishing touch was Doodle Bug baker's twine
to tie the 2 boxes together.

Hope this project inspires you to do something crafty today!

At Cutter's Creek:

Echo Park Collections
Doodle Bug Twine
Ranger Distress Inks

Chris' Faux Bargello Background Using Graphic 45

This is a great way to use up strips and scraps and make a variety of backgrounds. I started with four different papers (3 from Graphic 45 Hallowe’en In Wonderland Collection and one orange from my stash). I then cut the paper into strips about 3/4" wide by 8" tall and fiddled around with them until I liked the sequence of the strips. (You could possibly cut to six inches, but that limits how much shifting you can do with the strips later.) Using my Pink ATG, I glued them down on a thin piece of cardstock. (See figure 1)


I then turned the paper with all the strips sideways to cut through the 8" lengths, so when I cut the next set of strips they would have all the colors in them. (See Figure 2)


I cut these at random widths from 1/2" to 1". Now putting them next to each other on the table I shifted some strips up and some down until I had the pattern I wanted. (See Figure 3)


I transferred these strips to a 4 1/4" x 5 1/2" piece of cardstock that I had run through my Xyron. I made sure that I covered the whole piece and kept my pattern. Now all I had to do was trim off the excess paper and finish my card.


I used Happy Hauntings Cricut cartridge to make the tree at 4 1/2". The background layer was yellow Bazzill card stock and the top layer is a piece of Graphic 45 paper. I inked both layers with Vintage Photo Distress Ink and staggered the top layer as I glued it down with my Zig Glue Pen. The ghost is cut from mulberry paper, using the same Cricut cartridge, cut at 2 1/2". “Beware” is cut at 1". The green trims are remnants from a border I had made for another card, but that just set off the top of the card and under the tree.

Card 2 of 7 for Halloween done…how many do you have to make?

Wednesday, October 5, 2011

Holiday Crafts

This month we are focusing on die cutting machines. My favorite die cutting machines are my cricuts. I thought I would take a little time to show you how your cricut can help you make some Holiday Décor items. Since Halloween is right around the corner, I have a couple of Halloween projects to share with you. These projects were made using the Pumpkin Carving seasonal cartridge.This cartridge has some great designs to help you create the perfect Jack-O-Lantern. First, we picked our design and cut it out on the cricut with vinyl.

pumpkin carving

We placed the vinyl design on the pumpkin and traced around it. Then we carved it out and Voila- a very scary jack-o-lantern.

pumpkin carving2

If you don’t feel like carving an actual pumpkin, there are other ways to use this cartridge. I used some orange vinyl this time to create a jack-o-lantern out of a glass block.

pumpkin lamp 001 [1280x768]

I cut the design out of vinyl on my cricut and placed it on the front of the glass block. I put an led tealight candle in the bottom and wrapped some tulle around it. Here is what it looks like in the dark.

pumpkin lamp 004 [1280x768]

This would also me a great project to do for Christmas with a snowflake or another Christmas element on the block. Speaking of Christmas, I have one Christmas project to share with you.

I made this wreath with my Hello Kitty Greetings cartridge.

hello kitty wreath

When it’s time to decorate your house for the holidays, don’t forget about your cricut, it can help you make some great décor items.

Tuesday, October 4, 2011

A Peachy Keen Tutorial Tuesday

For this Tutorial Tuesday, I wanted to show you how easy it is to your Peachy Keen face stamps with your cricut die cuts.  How many times have you struggled with the little tiny pieces your cricut cuts for the eyes, nose, and mouth of your die cuts?  With Peachy Keen face stamps,you don’t have to worry about that anymore.   Peachy Keen makes some stamp sets that are designed to coordinate with certain cricut cartridges.
For this project I have chosen the Monster Mash face assortment.  I love the assortment packs because they give you a variety of sizes to use with different sized die cuts.  This set is perfect for the Mini Monsters and Bump in the Night cricut cartridges. To make it easier to use the stamps, you need to either cut your base layer in blackout or hide the cuts it wants to cut for the face.  You can do this with Design Studio, the Gypsy, or the new cricut craft room.  I did this on my gypsy.  Here is a picture of the button you need to do this.
pk tut 1_edited-1 [1280x768] When using the gypsy, the hide contour button is on the advanced menu and looks like 2 right angles.  Here is a picture of the Dracula cut when I have told it to hide the face cuts.
pk tut 2
It has greyed out the cuts it would make for the eyes and mouth and will not cut them.  This gives me enough space to cleanly stamp my face.
With Halloween on the way, I know I will need some treat bags, so I decided to use my Mini Monsters on some goody bags. 
peachy keen faces 007_edited-1
For my first little goody bag, I used this little round monster.  The paper is a mixture of Echo Park dots and stripes and some random cardstock.  The bag is cut from the Spring Holiday cards seasonal cartridge.  I outlined the monster with some purple stickles to give her some bling. 
pk tut 4 [1280x768]
For this next box I used a box from the Imagine cartridge All Wrapped Up.  This time I cut it on my cricut Expressions 2 since I only wanted to use plain cardstock.  I cut the box at 8 inches and it is a really nice size. The box also has a scalloped rectangle you can use for the top.  I placed my sea monster on top of that. 
pk tut 5 [1280x768]
For my final goody bag I used the vampire cut I showed you earlier in the tutorial.  Once again this box is from Spring Holiday Cards.  I ran some orange cardstock through my Cuttlebug using the Spots and Dots folder and then sanded the embossing. 
pk tut 6 [1280x768]
Dracula’s shirt is from Echo Park and I added some more stickles to his bow tie.
Remember, the next time you think you can’t cut paper dolls and animals on your cricut because the facial features cut just too small grab your Peachy Keen stamps and use them.  They’re easy and super cute!!!!
Related Posts with Thumbnails